What is Microsoft Producer 2003?
Well, simply put, Microsoft Producer 2003 is the latest version of the popular add-in for Microsoft Office PowerPoint 2003, and your way to produce online media rich fully interactive engaging presentations.
Offering an array of tools that make it easy to create, edit, synchronize, and publish rich-media presentations that can be viewed anytime in a users Internet browser, Microsoft Producer has grown since its early and primitive release to provide a platform for presenters to develop and deliver engaging presentations, training, and business communications.
In the first part of our Producer 2003 tutorial, we discovered how users of PowerPoint can use Producer 2003 to produce more dynamic and interactive presentations, and in doing so we gained overview of the application interface, and how to:
- Import Audio
- Import Video
- How to add Images, Slides, and HTML
- How to capture Video, Audio, Images, and other screen content
In this, our second of three Producer 2003 series of tutorials, we will examine how to:
- Edit Video in Producer 2003
- Add Video transitions
- Add Video effects
- Synchronize audtion and video with slides and images
For readers joining us for the first time, I do recommend reading the first part of our Producer 2003 tutorial to become acquainted with the application before progressing further.
Microsoft Producer 2003 is free for all registered users of Microsoft Office PowerPoint 2003 and 2002.
To download Producer 2003 and follow this tutorial, click here.

|
Editing Video in Producer 2003 |
Producer 2003 allows you to edit video clips and files imported into your project in several ways.
The Clip Detection Method, can automatically create clips based upon scene changes within your video file, or you can manually create smaller clips by using either the Split Control in the Preview Pane, or menu commands to specify In and Out points to produce smaller video clips from larger video files.
This ability of Producer allows you to edit, crop, and produce video for your project within one single application.
Traditionally, you may have used Adobe Premier, or Final Cut to edit your video files before embedding or importing them into PowerPoint. With Producer, you can now import your raw video clips and files, and edit them within your presentation project directly.
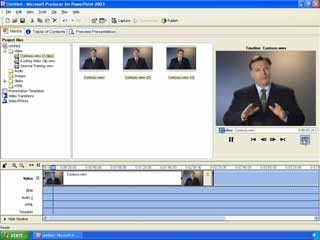
Before editing a video file in Producer 2003, you must first import a video file to edit.
To import video to your project choose either Import from the File Menu, or double click on the video folder in the tree pane on the left side of the screen. The center pane now updates to show any video files already inserted into your project, as well as an Import Video icon.
Double click the Import Video icon, and browse for the video file that you wish to import and press Open.
|
|
 |
Importing a video clip through the Video Pane
|
|
Once you have imported your video file, right click on the thumbnail of the clip in the center pane and choose the Create Clips command. This will split your video file into smaller clips making it easier to manage and use.
|
|
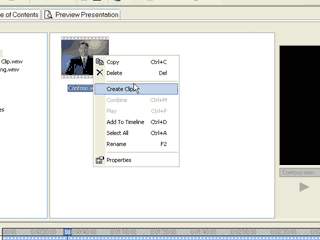 |
Right click your imported video file and select Create Clip
|
|
Depending on the size of your file and the processing speed of your computer this process can immediate or take several minutes.
A Creating Clips percentage bar displays as Producer 2003 processes your video file.
|
|
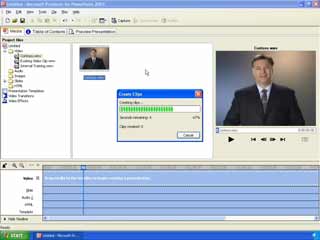 |
Creating Clips from your original video file
|
|
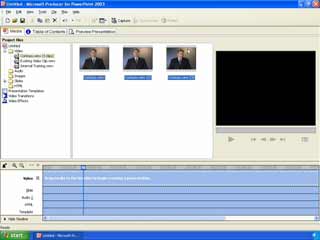
When your video file has been processed you will see several video clips now available in the center pane. These clips are in whole your original clip, and in individual parts, segments of your original video file.
In the illustration below, you can see our original file has been split into 3 easy to manage, smaller video files.
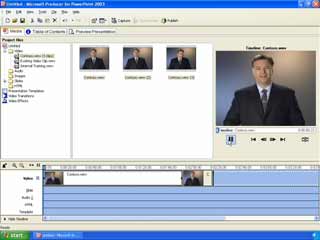
The easiest way to edit your video file is now to select all the segmented video clips of your original file in the center pane, and drag them onto the timeline.
|
|
 |
Select the video clips of the video file and
drag them onto the timeline
|
|
With your video now on the timeline, there are two ways in which you can edit your video.
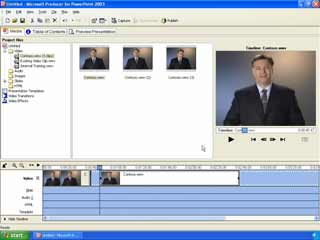
To use the Split control method, select the video by pointing and clicking on the clip in the timeline.
Then click the Play button in the preview pane to start the video.
|
|
 |
Select the video clip to edit using the Split control method
|
|
While your vide clip is playing, press the Spilt control, the button to the far right of the controls beneath your video preview in the preview pane, to insert cuts in your video clip, at In and Out intervals where you want your video to be edited.
In, being where it has played from, and Out, where the video clip should stop.
|
|
 |
Using the Split control method to edit your video clip
|
|
Right click the video segment on your timeline where a split was inserted, and select Delete to delete the unwanted segments from your edit.
|
|
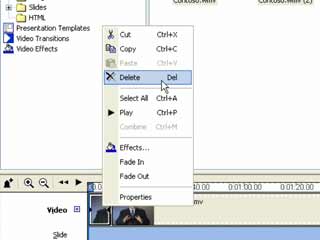 |
Deleting unwanted segments from your edited video clip
|
|
Then click and drag all clips on the timeline over to the left ensuring that the first clips starts at time 0, and that all clips are contiguous to complete your video edit.
To edit your video manually, you can also use menu commands to set the In and Out points of clips on your timeline.
Click the Play button in the video pane to play the clip.
Now, click the Pause button to stop the current clip so that you can insert an edit where you would like the new clip to start.
|
|
|
Editing your video clip manually through menu commands
|
|
Then, select Set Start Trim Point on the clip menu.
|
|
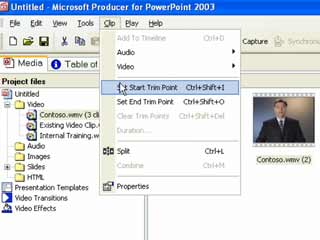 |
Setting the starting In point of your video clip
through menu commands
|
|
Click the Play button to continue playing the clip, and at the point you want the clip to end, select Set End Trim Point from the clip menu.
Editing video this way automatically removes the excess video at the start and ends of the video clip you are editing, without the need to right click the clip and delete the unrequired footage.
To create additional clips from the same original video file, drag the original clip back onto the timeline at a different place, and the repeat the process for as many manual edits and clips that you desire from the original file.
|
|
 |
With the original video file dragged again onto the timeline
in a dfferent place. Repeat manual editing process of a
single video file for the required number of clips
|
|
Click here to continue to page 2 of the tutorial and learn How to Add Video Transitions.
|
