Synchronizing your video and audio to slides
Once your selected video file and PowerPoint slides have been added to the timeline, you can then synchronize the image and slide transitions with the video and audio using the Synchronize Wizard.
To begin, drag your video clip or clips, and PowerPoint slides onto the timeline.
|
|
 |
Place your video and slide media onto the timeline
|
 |
To start the wizard, click on Synchronize from the main menu bar.
|
|
 |
Select Synchronize the main menu
|
 |
Two new windows now appear within your Producer project.
The one showing the slides from your PowerPoint presentation, and the other showing the Synchronize Slides dialog box.
|
|
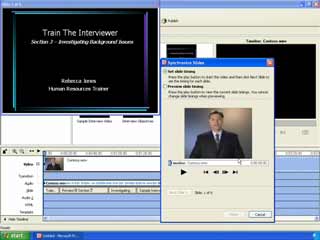 |
The Synchronize Wizard produces two new dialog boxes.
|
 |
By default the Set slide timing option should be selected.
To begin synchronizing, click the Play button in the synchronize slides window.
|
|
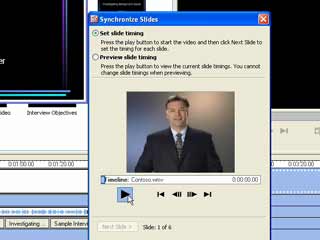 |
With the Set slide timing option selected click Play
|
 |
If you selected an audio clip rather than a video clip to synchronize with your slides, the audio file would still play in the same window.
As the video and/ or audio play, click the Next Slide button at the bottom of the Synchronize Slides window to advance the slides at the exact time you want the slides to change.
|
|
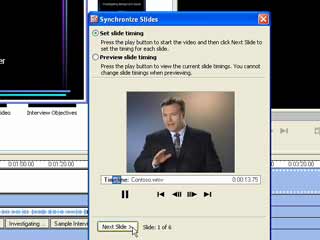 |
Click the Next Slide button synchronize your slides
with the video and/ or audio clip
|
 |
If you are using slide animations and effects that are triggered by onClick, then you will see the Next Slide button change into Next Effect.
This allows you to also synchronize the timings of your slide animations as well.
|
|
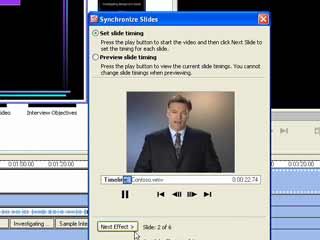 |
Click Next Effect to continue through your slide effects
|
 |
When the final slide animation of any individual slide is complete, the button will once again return to Next Slide.
Continue through your presentation until you have reached the end of your slides.
Once you have reached the end of your slides, you can then click the Preview slide timing radio button at the top of the Synchronize Slides window to preview the synchronization of your slides and video and/ or audio media.
|
|
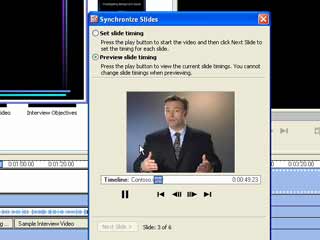 |
Select the Preview slide timing radio button
|
 |
When you now click the Play button in the Synchronize Slides window, your slides in the slide window will change and update according to the synchronization timing that you have set..
|
|
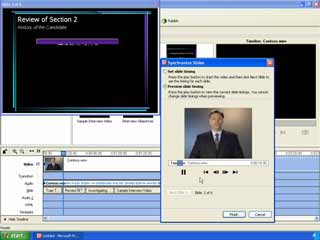 |
By pressing Play you can now preview your
video/ and or audio and slide synchronization
|
 |
If you are unhappy or wish to change your synchronization settings, simply click the Play button to pause your video and/ or audio clip, and click the Set slide timing radio button once again, and run the synchronization process once again.
Once you are satisfied with your synchronization timing settings, click Finish in the Syncronize Slides window.
|
|
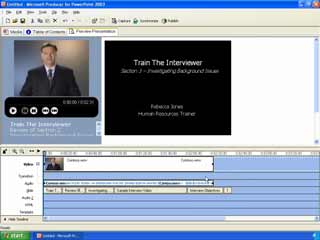 |
Click Finish to save your slide synchronization
|
 |
In Part 3 of the Producer 2003 tutorial |
Now that you are able to import and capture all media types and files for our projects, as well as how to add video effects to a video clip, video transition effects between two video clips, and synchronize audio and video with slides and images. We are finally ready to put everything together.
In our next and final part of our Producer 2003 series of tutorials, we learn how to:
- Choose a Producer 2003 presentation template.
- Preview a Producer 2003 presentation before publishing it.
- Publish a Producer 2003 presentation to a local drive or network share.
- Publish a Producer 2003 presentation to a Web server, or combination Web server and media server.
I'm sure you will agree that Producer 2003 does indeed provide an extremely comprehensive, yet intuitive suite of tools that will help you create more dynamic, effective, and stimulating presentation productions. And in our next and final tutorial we'll discover how to launch those productions, so that you will be able to create greater impact in your own media deliveries, e-learning, and corporate presentations.
Scott Harvey, Managing Director The Impossible Media Group
|